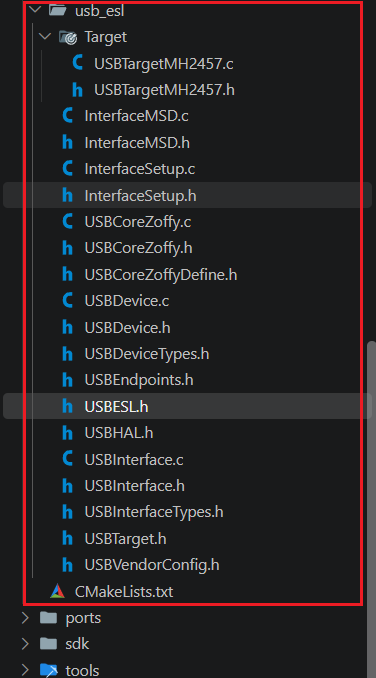
我们只需要移植MSD(UMS)功能。参看官方案例。进行迁移放入到middleware文件夹里面。
移植USB功能我们不需要考虑那么多。只需要给到单片机USB相关配置给这些文件就好了。
步骤 1:确认 DWC2 兼容 & 收集硬件参数
从新 MCU 数据手册拿到:USB 控制器寄存器基地址、USB 中断号、端点数、DM/DP 引脚、48MHz 时钟来源。
步骤 2:新建 Target/USBTarget.h
#ifndef __USB_TARGET_CONFIG_MH2457_H__
#define __USB_TARGET_CONFIG_MH2457_H__

#define USE_USBESL_CORE_ZOFFY 1

// Zoffy Features
#define FEATURE_USBCORE_ZOFFY_DYNAMIC_DMA_MODE 1

#define FEATURE_USBCORE_ZOFFY_MAX_EP_COUNT (6)

#include "mh2457.h"

// USB Core Base Address
#define USB_ZOFFY1_BASE 0x50000000
#define USB_ZOFFY1_IRQ  USB1_IRQn

#define USB_ZOFFY_BASE USB_ZOFFY1_BASE
#define USB_ZOFFY_IRQ  USB_ZOFFY1_IRQ

#ifndef USB_IO_CONFIG_DATA
#define USB_IO_CONFIG_DATA MakeIOConfig(IOModeAlternate, GPIO_AF_USB, IOPullNone, IOSpeedHigh, IODriveHigh)
#endif

#ifndef USB_IO_CONFIG_ID
#define USB_IO_CONFIG_ID MakeIOConfig(IOModeAlternate, GPIO_AF_USB, IOPullUp, IOSpeedMedium, IODriveMedium)
#endif

#ifndef USB_IO_CONFIG_VBUS
#define USB_IO_CONFIG_VBUS MakeIOConfig(IOModeInput, 0, IOPullNone, IOSpeedMedium, IODriveMedium)
#endif

#endif
新建 Target/USBTarget.c
extern void USBTargetConstractor(USBHALStruct* hal);   // 设能力位(DMA/Device/Host)
extern void USBTargetDelayUs(uint32_t us);             // → SystemDelayUs
extern void USBTargetEnablePhy(...);                   // PHY 上电 / GCFG
extern void USBTargetEnableInterrupt(...);             // NVIC Enable/Disable
extern void USBTargetEnableModule(...);                // ★引脚+48M时钟+外设使能
extern void USBTargetResetModule(...);                 // PeripheralReset
extern uint8_t USBTargetGetSN(...);                    // 序列号(可空)
#include "USBCoreZoffyDefine.h"
#include "USBESL.h"

inline void USBTargetConstractor(USBHALStruct* hal) {
    if (hal->USBBase == 0x50000000) { //USB硬件地址
        hal->IsDMAEnabled    = false; //关闭DMA
        hal->IsDeviceEnabled = true; //设备模式
        hal->IsHostEnabled   = false; //host关闭
        hal->IsSRPEnabled    = false; //SRP关闭
    }
    else {
        hal->IsDMAEnabled    = true;
        hal->IsDeviceEnabled = true;
        hal->IsHostEnabled   = false;
        hal->IsSRPEnabled    = false;
        hal->PhyType         = USBPhyTypeUTMI;
        hal->SpeedConfig     = USBSpeedConfigHigh;
    }
}

inline void USBTargetDelayUs(uint32_t us) {
    SystemDelayUs(us);
}

inline void USBTargetEnablePhy(USBHALStruct* hal, bool isEnable) {
    if (!isEnable || hal->PhyType == USBPhyTypeUTMI) {
        hal->Zoffy.USB->GREGS.GCFG = 0;
    }
    else {
        hal->Zoffy.USB->GREGS.GCFG = BIT(16); // Power ON

        if (!(hal->IsHNPEnabled || hal->IsSRPEnabled))
            hal->Zoffy.USB->GREGS.GCFG |= BIT(21); // NOVUBS
        else
            hal->Zoffy.USB->GREGS.GCFG |= BIT(19) | BIT(18); // VBUS A|B EN

        if (hal->PhyType == USBPhyTypeFSI2C) {
            hal->Zoffy.USB->GREGS.GI2CCTL = //
                BIT(26) |                   // I2C Addr 0x2D
                BIT(23);                    // I2C Enable
        }
        if (hal->USBBase == 0x50000000) {
            hal->Zoffy.MaxFifoSize = 0x140; // Fix FIFO size of USB 1 to 1280 bytes
        }
    }
}

inline void USBTargetEnableInterrupt(USBHALStruct* hal, bool isEnable) {
    IRQn_Type irq = USB1_IRQn;
    if (isEnable) {
        NVIC_EnableIRQ(irq);
    }
    else {
        NVIC_DisableIRQ(irq);
    }
}

inline void USBTargetEnableModule(USBHALStruct* hal, bool isEnable) {
    if (hal->USBBase == 0x50000000) {
        // Configure DM DP Pins
        IOSetup(PA11, USB_IO_CONFIG_DATA);
        IOSetup(PA12, USB_IO_CONFIG_DATA);

        // Configure ID Pin
        if (hal->IsDeviceEnabled && hal->IsHostEnabled) {
            IOSetup(PA10, USB_IO_CONFIG_ID);
        }

        // Configure VBUS Pin
        if (hal->IsSRPEnabled || hal->IsHNPEnabled) {
            IOSetup(PA9, USB_IO_CONFIG_VBUS);
        }
    }

    if (isEnable && (ClockGet(ClockNodeREF) / 1000000 != 48)) {
        ClockMultiply(ClockNodePLL3, ClockRatio(768 / 12.0));
        ClockDivide(ClockNodePLL3R, ClockRatio(768 / 48.0));
        ClockSelect(ClockNodeREF, ClockNodePLL3R);
        ClockEnable(ClockNodePLL3G, true);
    }

    PeripheralEnable(PeripheralUSB1, isEnable);
}

inline void USBTargetResetModule(USBHALStruct* hal) {
    PeripheralReset(PeripheralUSB1);
}
inline uint8_t USBTargetGetSN(uint8_t* sn, uint8_t length) {
    // TODO
    return 0;
}
步骤 4:改 USBESL.h 的 include(USBESL.h:17)
#include "Target/USBTargetMH2457.h" // → 改为 #include "Target/USBTarget<新MCU>.h"
步骤 5:对齐中断向量名
匹配MCU 启动文件里的向量名:
// usb_msd.c:418
void USB1_IRQHandler(void) {           // ← 必须与新 MCU startup_xxx.s 的向量弱符号同名
    s_usbHAL.Interrupt(&s_usbHAL);
}
步骤 6:配置 NVIC 优先级
NVIC_SetPriority(USB_ZOFFY1_IRQ, BSP_NVIC_PRIO_USB);